Extending
This page provides guides for how to extend the Administration Panel, as well as best practices when doing so.
Understanding Admin Themes
Just like when you are extending or modifying a regular Grav Theme, you will be overriding templates to change the structure and appearance of the Admin Plugin. This means that the templates your plugin declares to be used instead of the default ones should mirror the structure of the Admin Theme exactly. For example, if we wanted to change the avatar in the left-side navigation, we would change nav-user-avatar.html.twig.
In the Admin plugin, the path to templates is: user/plugins/admin/themes/grav/templates, hereafter referred to as ADMIN_TEMPLATES. The file we are looking for is ADMIN_TEMPLATES/partials/nav-user-avatar.html.twig, which contains <img src="https://www.gravatar.com/avatar/{{ admin.user.email|md5 }}?s=47" />.
In your plugin, the path to templates should be: user/plugins/myadminplugin/admin/themes/grav/templates, hereafter referred to as PLUGIN_TEMPLATES. The corresponding file should then be PLUGIN_TEMPLATES/partials/nav-user-avatar.html.twig, which would contain something like <img src="{{ myadminplugin_avatar_image_path }}" />.
Thus we are overriding the path to the template, but non-destructively. We target only the relevant template, in a way that does not override any unnecessary templates or hinder other admin themes from registering their alternate templates for the same use. To do this, we register the path in our plugin like this:
 1public static function getSubscribedEvents(): array
 2{
 3    return [
 4        'onAdminTwigTemplatePaths' => ['onAdminTwigTemplatePaths', 0]
 5    ];
 6}
 7
 8public function onAdminTwigTemplatePaths($event): void
 9{
10    $paths = $event['paths'];
11    $paths[] = __DIR__ . '/admin/themes/grav/templates';
12    $event['paths'] = $paths;
13}
It is important to remember that the theme used in the Admin plugin is sensitive to the templates available. As a general rule, you should only modify templates with low impact, that is, make changes that will not break the interface for any user who installs your plugin. In this sense it is better to override nav-user-avatar.html.twig than nav.html.twig, as the latter contains much more functionality but uses {% include 'partials/nav-user-details.html.twig' %} to include the former.
Warning
TIP: Admin template files have autoescaping turned on. You do not need to add |e filters to escape HTML content, but you do need to add |raw if your input is valid HTML.
Adding a custom field
To create a custom field, we will add it to PLUGIN_TEMPLATES/forms/fields/myfield. In the myfield-folder we need a Twig-template which declares how the field will operate. The easiest way to add a field is to find a similar field in ADMIN_TEMPLATES/forms/fields and copy that, to see how they are structured. For example, to add a HTML range-slider we create PLUGIN_TEMPLATES/forms/fields/range/range.html.twig. In this file, we add:
 1{% extends "forms/field.html.twig" %}
 2
 3{% block input_attributes %}
 4    type="range"
 5    {% if field.validate.min %}min="{{ field.validate.min }}"{% endif %}
 6    {% if field.validate.max %}max="{{ field.validate.max }}"{% endif %}
 7    {% if field.validate.step %}step="{{ field.validate.step }}"{% endif %}
 8    {{ parent() }}
 9{% endblock %}
This adds a field-type called "range", with the type range, that allows the user to select a value by sliding a button. To use the new field in a blueprint, we would simply add this in blueprints.yaml:
 1form:
 2  fields:
 3    radius:
 4      type: range
 5      label: Radius
 6      id: radius
 7      default: 100
 8      validate:
 9        min: 0
10        max: 100
11        step: 10
Which gives us a slider with a default value of 100, where accepted values are between 0 and 100, and each value increments by 10 as we slide it.
We could extend this further by using the prepend or append blocks available, by for example adding a visual indicator of the selected value. We change range.html.twig to contain this:
 1{% extends "forms/field.html.twig" %}
 2
 3{% block input_attributes %}
 4    type="range"
 5    style="display: inline-block;vertical-align: middle;"
 6    {% if field.id is defined %}
 7        oninput="{{ field.id }}_output.value = {{ field.id }}.value"
 8    {% endif %}
 9    {% if field.validate.min %}min="{{ field.validate.min }}"{% endif %}
10    {% if field.validate.max %}max="{{ field.validate.max }}"{% endif %}
11    {% if field.validate.step %}step="{{ field.validate.step }}"{% endif %}
12    {{ parent() }}
13{% endblock %}
14{% block append %}
15  {% if field.id is defined %}
16    <output
17        name="{{ (scope ~ field.name)|fieldName }}"
18        id="{{ field.id }}_output"
19        style="display: inline-block;vertical-align: baseline;padding: 0 0.5em 5px 0.5em;"
20    >
21    {{ value|join(', ')|e('html_attr') }}
22    </output>
23  {% endif %}
24{% endblock append %}
Thus we append an <output>-tag which will hold the selected value, and add to it and the field itself simple styling to align them properly. We also add an oninput-attribute to the field, so that changing values automatically updates the <output>-tag with the value. This requires that each field using the range-slider has an unique id-property, like the id: radius we declared above, which should be something like id: myadminplugin_radius to avoid conflicts.
Caution
If this new template will be shared between frontend and Admin Panel (e.g. using PLUGIN_TEMPLATES folder), you need to escape all variables with |e. Alternatively you can just go to Configuration > Twig Templating > Autoescape variables and turn it to Yes.
Creating custom page templates
As mentioned in Theme Basics, there is a direct relationship between pages in Grav and the Twig template files provided in a theme/ plugin. To create a custom page template, you will need a blueprint file to define the fields for the Admin plugin and a template file for rendering the content.
Adding a custom page template to a theme/ plugin
In the root of the theme/ plugin folder, create a folder named templates. Inside this folder, create a new mypage.html.twig file. This will be the Twig template for the new page template "mypage".
Example mypage.html.twig:
 1{% extends 'partials/base.html.twig' %}
 2
 3{% block content %}
 4    {{ page.header.newTextField|e }}
 5    {{ page.content|raw }}
 6{% endblock %}
There is more information about Twig theming in the Twig Primer section.
Themes automatically find template files within the theme's templates folder. If the template is being added via a plugin, you'll need to add the template via the event onTwigTemplatePaths:
 1public function onPluginsInitialized(): void
 2{
 3    // If in an Admin page.
 4    if ($this->isAdmin()) {
 5        return;
 6    }
 7    // If not in an Admin page.
 8    $this->enable([
 9        'onTwigTemplatePaths' => ['onTwigTemplatePaths', 1],
10    ]);
11}
12
13/**
14 * Add templates directory to twig lookup paths.
15 */
16public function onTwigTemplatePaths(): void
17{
18    $this->grav['twig']->twig_paths[] = __DIR__ . '/templates';
19}
Adding a custom page blueprint to a theme/ plugin
In order for the Admin plugin to provide a new mypage page option, create a folder named blueprints in the root of the theme/ plugin. Inside this folder, create a new mypage.yaml file. This is where you will define custom fields for the Admin plugin to display when creating a new page. Available form fields can be found in the Forms chapter.
The example blueprint mypage.yaml below extends the default page template, and then adds header.newTextField under the content tab.:
 1title: My Page Blueprint
 2'@extends':
 3    type: default
 4    context: blueprints://pages
 5
 6form:
 7  fields:
 8    tabs:
 9      type: tabs
10      active: 1
11      fields:
12        content:
13          type: tab
14          fields:
15             header.newTextField:
16              type: text
17              label: 'New Text Field'
Similarly to the templates folder, a theme will automatically add any blueprint yaml files found within the blueprints folder. If the blueprint is being added via a plugin, you'll need to add the blueprint via the event onGetPageTemplates:
 1public function onPluginsInitialized(): void
 2{
 3    // If in an Admin page.
 4    if ($this->isAdmin()) {
 5        $this->enable([
 6            'onGetPageBlueprints' => ['onGetPageBlueprints', 0],
 7            'onGetPageTemplates' => ['onGetPageTemplates', 0],
 8        ]);
 9    }
10}
11
12/**
13 * Add blueprint directory.
14 */
15public function onGetPageBlueprints(Event $event): void
16{
17    $types = $event->types;
18    $types->scanBlueprints('plugin://' . $this->name . '/blueprints');
19}
20
21/**
22 * Add templates directory.
23 */
24public function onGetPageTemplates(Event $event): void
25{
26    $types = $event->types;
27    $types->scanTemplates('plugin://' . $this->name . '/templates');
28}
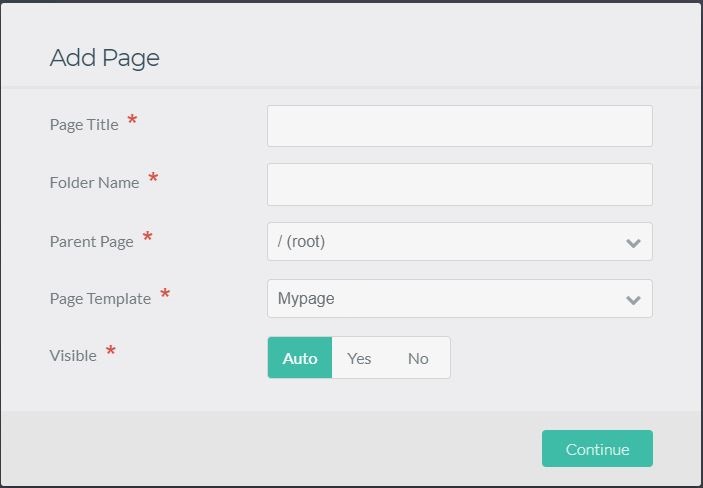
Creating a new page
After defining the blueprint and template files, create a new page within the admin panel by clicking on Add and then selecting "Mypage":
The Admin edit form now displays the new custom field "New Text Field":
