Admin Recipes
This page contains an assortment of problems and their respective solutions related to Grav Admin modifications.
Add a custom YAML file
Problem:
You want to provide a site-wide group of user-editable company fields akin to system.yaml or site.yaml, but in its own dedicated file.
Solution:
As outlined in the Basics / Configuration section, the first step is to provide your new YAML data file, for example: user/config/details.yaml:
 1name: 'ABC Company Limited'
 2address: '8732 North Cumbria Street, Golden, CO, 80401'
 3email:
 4  general: '[email protected]'
 5  support: '[email protected]'
 6  sales: '[email protected]'
 7phone:
 8  default: '555-123-1111'
Now you need to provide the appropriate blueprint file to define the form. The blueprint can be provided by a plugin, but the simplest approach is to simply put the blueprint in a file: user/blueprints/config/details.yaml
If you wanted to provide the blueprint via a plugin, you would first need to add this code to your plugin right after the class definition:
 1class MyPlugin extends Plugin
 2{
 3    public $features = [
 4        'blueprints' => 1000,
 5    ];
 6    protected $version;
 7    ...
Then add this code to your onPluginsInitialized() method:
 1if ($this->isAdmin()) {
 2    // Store this version and prefer newer method
 3    if (method_exists($this, 'getBlueprint')) {
 4        $this->version = $this->getBlueprint()->version;
 5    } else {
 6        $this->version = $this->grav['plugins']->get('admin')->blueprints()->version;
 7    }
 8}
Then create a file called user/plugins/myplugin/blueprints/config/details.yaml
The actual blueprint file should contain a form definition that matches the configuration data:
 1title: Company Details
 2form:
 3    validation: loose
 4    fields:
 5
 6        content:
 7            type: section
 8            title: 'Details'
 9            underline: true
10        name:
11            type: text
12            label: 'Company Name'
13            size: medium
14            placeholder: 'ACME Corp'
15
16        address:
17            type: textarea
18            label: 'Address'
19            placeholder: '555 Somestreet,\r\nNewville, TX, 77777'
20            size: medium
21
22        email:
23            type: array
24            label: 'Email Addresses'
25            placeholder_key: Key
26            placeholder_value: Email Address
27
28        phone:
29            type: array
30            label: 'Phone Numbers'
31            placeholder_key: Key
32            placeholder_value: Phone Number
The use of the array field type will let you add arbitrary email and phone fields as you need them.
Add a custom page creation modal
Problem:
You want to provide an easy way to create a new blog post or gallery image page. We will go with the blog post for this example. Assume you want to make a blog and easily create a blog post in the correct folder by clicking a button.
Solution:
First of all, create the form for our modal. Create a new file: user/blueprints/admin/pages/new_post.yaml.
 1form:
 2  validation: loose
 3  fields:
 4    section:
 5        type: section
 6        title: Add Post
 7
 8    title:
 9      type: text
10      label: Post Title
11      validate:
12        required: true
13
14    folder:
15      type: hidden
16      default: '@slugify-title'
17
18    route:
19      type: hidden
20      default: /posts
21
22    name:
23      type: hidden
24      default: 'post'
25
26    visible:
27      type: hidden
28      default: ''
29
30    blueprint:
31      type: blueprint
This form mimics the default Add Page modal's form. For the folder as you can see we have a special value: @slugify-title. This means that the folder will default to the slugified version of the title form input. route is /posts so it will put it into the /posts folder.
name is post so it will use the post page blueprint.
Second step is to edit the configuration of the Admin plugin. To add custom code to the configuration file admin.yaml of the Admin Plugin, create the file user/config/plugins/admin.yamland add this snippet:
 1add_modals:
 2  -
 3    label: Add Post
 4    blueprint: admin/pages/new_post
 5    show_in: bar
Configuration keys/values available for add_modals:
label- text to be shown in the buttonshow_in(default: bar) (values: bar|dropdown) - whether to show the button in the bar or dropdownblueprint- blueprint used by the templatetemplate- template used by the modal (default: partials/blueprints-new.html.twig)with- data which is passed to the templatelink_classes- classes to add to the link elementmodal_classes- classes to add to the modal element
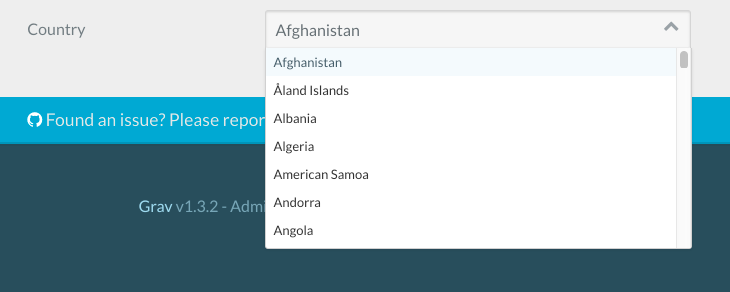
Add a custom select field
Problem:
You want to add a select field with a large list of values. In this example, we will assume you want to display a list of countries.
Solution:
You can create a static function and call the array from within your blueprint. You can code this function either in your theme's php file, or in a custom plugin.
In this example, we will add the function to the Antimatter theme, we will thus edit the antimatter.php file which is in the user/themes/antimatter folder.
 1<?php
 2namespace Grav\Theme;
 3
 4use Grav\Common\Theme;
 5
 6class Antimatter extends Theme
 7{
 8    public static function countryCodes()
 9    {
10        return array (
11            'AF' => 'Afghanistan',
12            'AX' => 'Åland Islands',
13            'AL' => 'Albania',
14            'DZ' => 'Algeria',
15            'AS' => 'American Samoa',
16            'AD' => 'Andorra',
17            'AO' => 'Angola',
18            'AI' => 'Anguilla',
19            'AQ' => 'Antarctica',
20            'AG' => 'Antigua & Barbuda',
21            'AR' => 'Argentina',
22            'AM' => 'Armenia',
23            'AW' => 'Aruba',
24            'AC' => 'Ascension Island',
25            'AU' => 'Australia',
26            'AT' => 'Austria',
27            'AZ' => 'Azerbaijan',
28            'BS' => 'Bahamas',
29            'BH' => 'Bahrain',
30            'BD' => 'Bangladesh',
31            'BB' => 'Barbados',
32            'BY' => 'Belarus',
33            'BE' => 'Belgium',
34            'BZ' => 'Belize',
35            'BJ' => 'Benin',
36            'BM' => 'Bermuda',
37            'BT' => 'Bhutan',
38        );
39    }
40}
Warning
This is a trimmed-down list for easy viewing but you can copy/paste the full country list from umpirsky/count-list
Then, we call the function from a blueprint or a frontend form definition like this:
 1country:
 2  type: select
 3  label: Country
 4  data-options@: '\Grav\Theme\Antimatter::countryCodes'
Here is how it will look in the admin