General Recipes
This page contains an assortment of problems and their respective solutions related to Grav in general.
Change the PHP CLI version
Sometimes on the terminal, the PHP version is different than the PHP version used by the web server.
You can check the PHP version running in the CLI by running the command php -v.
If the PHP version is less than 5.5.9, Grav won't run as it requires at least PHP 5.5.9.
How to fix?
You need to enter some configuration to .bashrc, or to .bash_profile in your user home folder. Create those files if you don't already have them in the user folder. They are hidden files, so you might have to do ls -al to show them. Once the configuration is added, you'll need to start a new terminal session for those settings to apply.
An example configuration could be:
alias php="/usr/local/bin/php53"
export PHP_PATH = /usr/local/bin/php53
An alternative way is to add:
 1# .bash_profile
 2
 3# Get the aliases and functions
 4if [ -f ~/.bashrc ]; then
 5        . ~/.bashrc
 6fi
 7
 8# User specific environment and startup programs
 9
10PATH=/usr/local/lib/php-5.5/bin:$PATH:$HOME/bin
11
12export PATH
The exact path of course depends on how your system is set up, where it stores the more recent PHP version binaries. That might be something you find in the Hosting documentation, or you can ask your hosting setup if you do not find it anywhere.
You could also try looking in the php-something files or folders under the /usr/local/bin or /usr/local/lib folders, with ls -la /usr/local/lib/ |grep -i php.
Creating a simple gallery
Problem:
A common web design requirement is to have a gallery of some kind rendered on a page. This could be to display photographs of your new family pet, a portfolio of previous design work, or even a basic catalog of some products you wish to display and sell to your users. In this example, we'll assume you want to just display a bunch of photographs with a caption below. This can of course be adapted to other uses also.
Solution:
The simplest way to provide a solution for this problem is to make use of Grav's media functionality which allows a page to be aware of the images available in its folder.
Let's assume you have a page you've called gallery.md and also you have a variety of images in the same directory. The filenames themselves are not important as we will just iterate over each of the images. Because we want to have extra data associated with each image, we will include a meta.yaml file for each image. For example, we have a few images:
 1- fido-playing.jpg
 2- fido-playing.jpg.meta.yaml
 3- fido-sleeping.jpg
 4- fido-sleeping.jpg.meta.yaml
 5- fido-eating.jpg
 6- fido-eating.jpg.meta.yaml
 7- fido-growling.jpg
 8- fido-growling.jpg.meta.yaml
Each of the .jpg files are a relatively good size that is appropriate for a full-size version, 1280px x 720px in size. Each of the meta.yaml files contain a few key entries, let's look at fido-playing.jpg.meta.yaml:
 1title: Fido Playing with his Bone
 2description: The other day, Fido got a new bone, and he became really captivated by it.
You have complete control over what you put in these meta files, they can be absolutely anything you need.
Now we need to display these images in reverse chronological order so the newest images are shown first and display them. Because our page is called gallery.md we should create an appropriate templates/gallery.html.twig to contain the rendering logic we need:
 1{% extends 'partials/base.html.twig' %}
 2
 3{% block content %}
 4    {{ page.content|raw }}
 5
 6    <ul>
 7    {% for image in page.media.images %}
 8    <li>
 9        <div class="image-surround">
10            {{ image.cropResize(300,200).html|raw }}
11        </div>
12        <div class="image-info">
13            <h2>{{ image.meta.title }}</h2>
14            <p>{{ image.meta.description }}</p>
15        </div>
16    </li>
17    {% endfor %}
18    </ul>
19
20{% endblock %}
For a modular gallery to be displayed inside another page, remove the following code from the Twig file in order to make it work:
 1{% extends 'partials/base.html.twig' %}
 2
 3{% block content %}
 4    {{ page.content|raw }}
and
{% endblock %}
Basically, this extends the standard partials/base.html.twig (assuming your theme has this file), it then defines the content block and provides the content for it. The first thing we do is echo out any page.content. This would be the content of the gallery.md file, so it could contain a title, and a description of this page.
The next section simply loops over all the media of the page that are images. We are outputting these in an unordered list to make the output semantic, and easy to style with CSS. we are assigning each image the variable name image and then we are able to perform a simple cropResize() method to resize the image to something suitable, and then below it, we provide an information section with the title and description.
You could make a more advanced gallery-implementation by using creating filters for camera-data, with the EXIF-function.
Render content in columns
Problem:
A question that has come up several times is how to quickly render a single page in multiple columns.
Solution:
There are many potential solutions, but one simple solution is to divide up your content into logical sections using a delimiter such as the HTML <hr /> or thematic break tag. In markdown, this is represented by 3 or more dashes or ---. We simply create our content and separate our sections of content with these dashes:
columns.md
 1---
 2title: 'Columns Page Test'
 3---
 4
 5Lorem ipsum dolor sit amet, consectetur adipiscing elit. Maecenas arcu leo, hendrerit ut rhoncus eu, dictum vitae ligula. Suspendisse interdum at purus eget congue. Aliquam erat volutpat. Proin ultrices ligula vitae nisi congue sagittis. Nulla mollis, libero id maximus elementum, ante dolor auctor sem, sed volutpat mauris nisl non quam.
 6
 7---
 8Phasellus id eleifend risus. In dui tellus, dignissim id viverra non, convallis sed ante. Suspendisse dignissim, felis vitae faucibus dictum, dui mi tempor lectus, non porta elit libero quis orci. Morbi porta neque quis magna imperdiet hendrerit.
 9
10---
11Praesent eleifend commodo purus, sit amet viverra nunc dictum nec. Mauris vehicula, purus sed convallis blandit, massa sem egestas ex, a congue odio lacus non quam. Donec vitae metus vitae enim imperdiet tempus vitae sit amet quam. Nam sed aliquam justo, in semper eros. Suspendisse magna turpis, mollis quis dictum sit amet, luctus id tellus. Vestibulum ante ipsum primis in faucibus orci luctus et ultrices posuere cubilia Curae; Aenean eu rutrum mi.
Caution
Note: the extra line after the column and before the ---. This is because if you put a triple dash right underneath text, it's actually interpreted as a header.
Then we simply need to render this content with a columns.html.twig template (as the page file was named columns.md):
 1{% extends 'partials/base.html.twig' %}
 2
 3{% block content %}
 4    <table>
 5        <tr>
 6            {% for column in page.content|split('<hr />') %}
 7            <td>{{ column|raw }}</td>
 8            {% endfor %}
 9        </tr>
10    </table>
11{% endblock %}
You can see how the content is being split by the <hr /> tag and converted into an array of 3 columns which we loop over and render. In this example we are using a simple HTML table tag, but you could use anything you wish.
Caution
Note: When using plugin page-toc, you'll need use |split('<hr>') since the page-toc plugin cleanses the HTML code.
Really simple css image slider
Problem:
You need an image slider without any overhead.
Solution:
This recipe is for 4 images and a page called slider.md! Simply put the images where the .md file is. Next, create a new Twig template and extend base.html.twig.
 1{% extends 'partials/base.html.twig' %}
 2
 3{% block content %}
 4
 5    <div id="slider">
 6        <figure>
 7        {% for image in page.media.images %}
 8            {{ image.html|raw }}
 9        {% endfor %}
10        </figure>
11    </div>
12
13    {{ page.content|raw }}
14{% endblock %}
For modular slider, please remove the
 1{% extends 'partials/base.html.twig' %}
 2
 3{% block content %}
and
{% endblock %}
from the previous Twig file.
Time for css stuff. Add this to your _custom.scss
 1@keyframes slidy {
 2    0% { left: 0%; }
 3    20% { left: 0%; }
 4    25% { left: -100%; }
 5    45% { left: -100%; }
 6    50% { left: -200%; }
 7    70% { left: -200%; }
 8    75% { left: -300%; }
 9    95% { left: -300%; }
10    100% { left: -400%; }
11}
12body { margin: 0; }
13div#slider {
14    overflow: hidden;
15    margin-top: -3rem;
16    max-height: 30rem;
17}
18div#slider figure img { width: 20%; float: left; }
19div#slider figure {
20    position: relative;
21    width: 500%;
22    margin: 0;
23    left: 0;
24    animation: 30s slidy infinite;
25}
That's all.
Wrapping markdown into html
On some pages you might want to wrap parts of the markdown content into some custom html code instead of creating a new Twig template.
To achieve this you follow these steps:
in your system configuration file user/config/system.yaml make sure to activate the markdown extra option:
 1pages:
 2  markdown:
 3    extra: true
in your wrapper tag make sure to add the parameter markdown="1" to activate processing of markdown content:
 1<div class="myWrapper" markdown="1">
 2# my markdown content
 3
 4this content is wrapped into a div with class "myWrapper"
 5</div>
done.
Add a recent post widget to your sidebar
Problem:
You want to create a recent post widget on the sidebar
Solution:
It's always possible to create a partial template extending partials/base.html.twig (see other solutions on this page), but here you're going to create a full template instead. The final code for your Twig template is shown below:
 1<div class="sidebar-content recent-posts">
 2    <h3>Recent Posts</h3>
 3    {% for p in page.find('/blog').children.order('date', 'desc').slice(0, 5) %}
 4        {% set bannerimage = p.media['banner.jpg'] %}
 5        <div class="recent-post">
 6            {% if bannerimage %}
 7                <div class="recent-post-image">{{ bannerimage.cropZoom(60,60).quality(60) }}</div>
 8            {% else %}
 9                <div class="recent-post-image"><img src="{{ url('theme://images/logo.png') }}" width="60" height="60"></div>
10            {% endif %}
11            <div class="recent-post-text">
12                <h4><a href="{{p.url}}">{{ p.title }}</a></h4>
13                <p>{{ p.date|date("M j, Y")}}</p>
14            </div>
15        </div>
16    {% endfor %}
17</div>
All this code does is sort the children (blog posts) of the /blog page by decending date order. It then takes the first five blog posts using the slice Twig filter. By the way, slice(n,m) takes elements from n to m-1. In this example, any blog posts that have a banner image have been named banner.jpg. This is set in a variable bannerimage. If bannerimage exists, it is shrunk down to a 60px x 60px box and will appear to the left of the post title text and date. If it does not exist, the website logo is resized to 60px x 60px and placed to the left of the title and date text instead.
The CSS for this widget is listed below:
 1.sidebar-content .recent-post {
 2    margin-bottom: 25px;
 3    padding-bottom: 25px;
 4    border-bottom: 1px solid #F0F0F0;
 5    float: left;
 6    clear: both;
 7    width: 100%;
 8}
 9
10.sidebar-content [class~='recent-post']:last-of-type {
11    border-bottom: none;
12}
13
14.sidebar-content .recent-post .recent-post-image,
15.sidebar-content .recent-post .recent-post-text {
16    float: left;
17}
18
19.sidebar-content .recent-post .recent-post-image {
20    margin-right: 10px;
21}
22
23.sidebar-content .recent-post .recent-post-text h4 {
24    font-family: serif;
25    margin-bottom: 10px;
26}
27
28.sidebar-content .recent-post .recent-post-text h4 a {
29    color: #193441;
30}
31
32.sidebar-content .recent-post .recent-post-text p {
33    font-family: Arial, sans-serif;
34    font-size: 1.5rem;
35    color: #737373;
36    margin: 0;
37}
Adjust the spacing between recent post items, font-family, font-size and font-weight to taste.
Create a private area
Grav makes it very easy to create a private area on a website. It all works thanks to the Login Plugin.
Require users to login prior to access a part of the site
If you don’t have it already, install it through the Admin Panel or using the GPM command line utility.
Next, open a page in Admin, switch to expert mode and in the FrontMatter section add
 1access:
 2    site.login: true
Users accessing the page will need to login prior to see the page content.
Notice that the permission does not extend by default to subpages. To do so, from the Login plugin configuration enable "Use parent access rules".
This option allows you to create extended private areas without worrying further about access level. Just put all under a page which has a restriction on access.
Require special permissions to view one or more pages
Similarly to the above process, you can assign any permission you want to a page. You can even come up with your own permission names.
For example:
 1access:
 2    site.onlybob: true
Next, add the site.onlybob permission to Bob, in its bob.yaml user file under the user/accounts folder:
 1access:
 2    site.onlybob: true
Use group-based permissions
You can also assign users to a group, and assign permissions to the group instead of to individual users. Users will inherit the group permissions.
Add a user/config/groups.yaml file, for example with this content:
 1registered:
 2  readableName: 'Registered Users'
 3  description: 'The group of registered users'
 4  access:
 5    site:
 6      login: true
 7premium:
 8  readableName: 'Premium Members'
 9  description: 'The group of premium members'
10  access:
11    site:
12      login: true
13      paid: true
Now assign users to a group by adding
 1groups:
 2      - premium
to their yaml user file, under user/accounts
Now users belonging to the premium group will be allowed to access pages with a site.paid permission.
Add JavaScript to the footer
In many cases you'd want "some" javascript to be added to the footer instead of the page header, to be loaded after the content has been rendered.
A good example of doing this is to check the Antimatter theme.
Antimatter's templates/partials/base.html.twig defines a bottom block for js by calling {{ assets.js('bottom') }}
 1{% block bottom %}
 2    {{ assets.js('bottom') }}
 3{% endblock %}
You can add assets in that block in Twig for example by calling
{% do assets.addJs('theme://js/slidebars.min.js', {group: 'bottom'}) %}
or in PHP by calling
$this->grav['assets']->addJs($this->grav['base_url'] . '/user/plugins/yourplugin/js/somefile.js', ['group' => 'bottom']);
Override the default logs folder location
The default location for the logs output of Grav is simply called logs/. Unfortunately, there are instances where that logs/ folder is already used or is off-limits. Grav's flexible stream system allows the ability to customize the locations of these folders.
First, you need to create your new folder. In this example, we'll create a new folder in the root of your Grav install called grav-logs/. Then create a new root-level file called setup.php and paste the following code:
 1<?php
 2use Grav\Common\Utils;
 3
 4
 5return [
 6    'streams' => [
 7        'schemes' => [
 8            'log' => [
 9               'type' => 'ReadOnlyStream',
10               'prefixes' => [
11                   '' => ["grav-logs"],
12               ]
13            ]
14        ]
15    ]
16];
This basically overrides the log stream with the grav-logs/ folder rather than the default logs/ folder as defined in system/src/Grav/Common/Config/Setup.php.
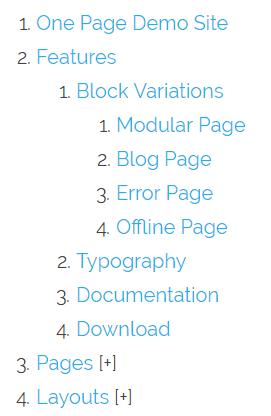
Split vertical menu system
To create a vertical, collapsible, hierarchical menu of pages you need a Twig-loop, a bit of CSS, and a bit of JavaScript. The final result will, when using the Antimatter-theme, look like this:
Let's start with Twig:
 1<ol class="tree">
 2    {% for page in pages.children.visible %}
 3        {% if page.children.visible is empty %}
 4            <li class="item">
 5            <a href="{{ page.url }}">{{ page.title }}</a>
 6        {% else %}
 7            <li class="parent">
 8            <a href="javascript:void(0);">{{ page.title }}</a>
 9            <ol>
10                {% for child in page.children.visible %}
11                    {% if child.children.visible is empty %}
12                        <li class="item">
13                        <a href="{{ child.url }}">{{ child.title }}</a>
14                    {% else %}
15                        <li class="parent">
16                        <a href="javascript:void(0);">{{ child.title }}</a>
17                        <ol>
18                            {% for subchild in child.children.visible %}
19                                <li><a href="{{ subchild.url }}">{{ subchild.title }}</a></li>
20                            {% endfor %}
21                        </ol>
22                    {% endif %}
23                    </li>
24                {% endfor %}
25            </ol>
26        {% endif %}
27        </li>
28    {% endfor %}
29</ol>
This creates an ordered list which iterates over all visible pages within Grav, going three levels deep to create a structure for each level. The list wrapped around the entire structure has the class tree, and each list-item has the class parent if it contains children or item if it does not.
Clicking on a parent opens the list, whilst regular items link to the page itself. You could add this to virtually any Twig-template in a Grav theme, provided that Grav can access the visible pages.
To add some style, we add some CSS:
 1<style>
 2ol.tree li {
 3    position: relative;
 4}
 5ol.tree li ol {
 6    display: none;
 7}
 8ol.tree li.open > ol {
 9    display: block;
10}
11ol.tree li.parent:after {
12    content: '[+]';
13}
14ol.tree li.parent.open:after {
15    content: '';
16}
17</style>
This should generally be placed before the Twig-structure, or ideally be streamed into the Asset Manager in your theme. The effect is to add [+] after each parent-item, indicating that it can be opened, which disappears when opened.
Finally, let's add a bit of JavaScript to handle toggling the open-class:
 1<script type="text/javascript">
 2var tree = document.querySelectorAll('ol.tree a:not(:last-child)');
 3for(var i = 0; i < tree.length; i++){
 4    tree[i].addEventListener('click', function(e) {
 5        var parent = e.target.parentElement;
 6        var classList = parent.classList;
 7        if(classList.contains("open")) {
 8            classList.remove('open');
 9            var opensubs = parent.querySelectorAll(':scope .open');
10            for(var i = 0; i < opensubs.length; i++){
11                opensubs[i].classList.remove('open');
12            }
13        } else {
14            classList.add('open');
15        }
16    });
17}
18</script>
This should always be placed after the Twig-structure, also ideally in the Asset Manager.
Dynamically style one or more pages
You can dynamically style different pages/posts in your Grav site (independent of template file assignment) by customizing a Theme's Twig file to apply a CSS class passed as a variable in a page's FrontMatter.
You can style different posts/pages in your Grav site by two methods:
- If you are using the Antimatter theme, you can use the existing
body_classesheader property to set your custom CSS class for that page - If you are using a theme not based on Antimatter (or not implementing
body_classesas it does), you can customize a Theme's Twig file to apply a CSS class passed as a variable in a page's header property
For example, in your theme's base.html.twig file or a more specific template such as page.html.twig file you could add a class to the display of page content, such as:
 1<div class="{{ page.header.body_classes }}">
 2...
 3</div>
Then, for each page you wish to have a unique style, you would add the following header property (assuming you have defined a CSS class for featurepost):
1body_classes: featurepost
Note: This is how the Antimatter theme applies page-specific classes, and so it's a good standard to follow.
Migrate an HTML theme to Grav
Migrating an HTML theme to Grav is a common task. Here is a hands-on step-by-step process that can be used to achieve this goal.
You probably have downloaded the theme, and it's composed of several HTML files. Let's start with simply making Grav load the home page. No custom content, just replicate the HTML theme, but within a Grav structure.
First, use the Grav Devtools plugin to create a blank theme, and set Grav to use it in the System settings.
Create a templates/home.html.twig Twig template inside the theme’s templates folder. This will represent a template specific for the home page. Usually, the home is a unique page on the site, so it probably deserves a dedicated Twig file.
Copy the HTML code from the template's home page, starting at <html> and ending at </html> to your new home.html.twig file.
Now, move all the HTML theme assets (images, CSS, JS) into your theme folder. You can keep the existing theme folder structure, or change it.
Create a pages/01.home/home.md empty file. Now point your browser to yoursite.com/home: it should show up the content, but the CSS, JS and images will not be loaded, probably because the theme has them hardcoded as /img/* or /css/* links.
Adding the correct asset links
In Grav the links are broken because they point to the home route, so instead of pointing to /user/themes/mytheme/img, they point to /img in the Grav root. Since it's best to keep all theme-related assets inside the theme, we need to point Grav to the correct location.
Search within the page for assets and change the images references from img/*.* to <img src="{{ url('theme://img/*.*', true) }}" />.
Stylesheets require a bit more thought as there’s an asset pipeline we’ll want to enable at some point, so we move them to a stylesheets block within the <head> tag.
Example:
 1{% block stylesheets %}
 2    {% do assets.addCss('theme://css/styles.min.css', 100) %}
 3{% endblock %}
 4{{ assets.css()|raw }}
The same applies to JavaScript files, with the additional requirement that some JS is loaded in the footer.
Example:
 1{% block javascripts %}
 2    {% do assets.addJs('theme://js/custom.js') %}
 3    {% do assets.addJs('jquery', 101) %}
 4{% endblock %}
 5{{ assets.js()|raw }}
The page changes should now be shown in your Browser. If not, make sure that the pages cache and the twig cache are disabled in the Grav system configuration settings.
This is just the start. Now you might need to add more pages, and come up with better ways to present the content of your pages using the header FrontMatter, and custom Twig that processes usual building blocks need: the home page testimonials, reviews, the product features and so on.
Adding another page
To add another page, the process is similar. For example, let's say you want to next create the blog page.
Repeat the process to add a templates/blog.html.twig file, paste the HTML source, and create a pages/02.blog/blog.md page.
Now, while images links inside the pages still need to be migrated to Grav's assets syntax (or simply change the path), you don't want to repeat the same work you did above for CSS and JS assets. This should be reused across the site.
Shared Elements
Identify the common parts of the pages (header and footer), and move them to the templates/partials/base.html.twig file.
Each page template then needs to extend partials/base.html.twig (https://github.com/getgrav/grav-theme-antimatter/blob/develop/templates/default.html.twig#L1) and just add their unique content.
Add an asset to a specific page
Problem
You need to add an asset to a specific template on your theme.
Solution
Most of the time, your assets will be added inside a twig block in your base template like below.
 1{% block javascripts %}
 2    {% do assets.addJs('theme://js/jquery.js', 91) %}
 3{% endblock %}
 4{{ assets.js()|raw }}
In order to add your asset, you have to extend this block in your template and call {{ parent() }} which will get the assets already added in your base template.
Let's say you want to add a "gallery.js" file on your "Portfolio Gallery" page.
Edit your template and add your asset with the {{ parent() }}.
 1{% block javascripts %}
 2  {% do assets.addJs('theme://js/gallery.js', 100) %}
 3  {{ parent() }}
 4{% endblock %}
Reuse page or modular content on another page
Problem:
You have many pages or modules and would like to share the same content block on more than one page without having to maintain multiple separate instances of the same text.
Solution:
This is a very simple straightforward method which does not require a plugin and can be used within the admin panel.
Note: There is also plugin Grav Page Inject Plugin for this functionality which may be suitable for more advanced scenarios.
First, create a new template file to act as a placeholder for the content - it can have any name, this one is named "modularreuse" and will be in the stored in your theme's templates/modular folder for this example but can be stored anywhere in the templates folder.
modular_reuse.html.twig contains only one line:
1{{ page.content|raw }}
Next, create a new modular page in the admin panel where this content should be displayed using this new "modular reuse" template. The new page name can be anything you like as it will not be displayed - the original page title will be output.
The content of the page is just one line: Page:
1{% include 'modular_reuse.html.twig' with {'page': page.find('/test-page/amazing-offers')} %}
Modular:
1{% include 'modular/modular_reuse.html.twig' with {'page': page.find('/test-page/_amazing-offers')} %}
What comes after "include" is where the template from step one is stored, probably in the templates folder for pages in the templates/modular folder for modulars.
After page.find should come the actual link to the original content that you want to reuse. Modular content starts with an _ but pages do not. The easiest way to find the correct link is to open the page in the admin panel and copy the url after the word admin.
The final page should look like this:
 1---
 2title: 'Modular Reuse Example'
 3---
 4
 5{% include 'modular/modular_reuse.html.twig' with {'page': page.find('/test-page/_amazing-offers')} %}
Now "amazing offers" can be displayed in multiple places but only needs to be updated once.
Make a custom anti-spam field for your contact form
Problem:
Normal methods of spam-prevention, like the honeypot-field, is bypassed by certain spam-bots.
Solution:
Make it harder for the bot to guess what it can and can't fill it in, when filling out the contact form. Put simply, ask a question the user won't fail to answer, but whose answers are hard for a bot to understand the significance of. In your Markdown-file with Form-data, add this field:
 1- name: personality
 2  type: radio
 3  label: What is five times eight?
 4  options:
 5    alaska: 32
 6    oklahoma: 40
 7    california: 48
 8  validate:
 9    required: true
10    pattern: "^oklahoma$"
11    message: Not quite, try that math again.
The question should be something simple, but with multiple simple wrong answers accompanying it. What matters is the order of the answers. The right answer should never be the first one; aim for somewhere in the middle. It's important to randomize the values behind the answers (labels) yourself, so a database of associated values and answers won't help in answering.
Bots get smarter all the time, but they tend to forego trying to answer the same question several times if the first attempt fails. Also, even the smartest of them rely on dictionaries of known data to guess at an answer. We ask a simple question, "What is five times eight?", and give three options, "32", "40", and "48". The right answer is obviously "40", but instead of checking the bot's math-skills, we're assigning the values "alaska", "oklahoma", and "california" to these numbers, respectively. Because bots look at the possible values, rather than their label, the answers bears no relation to the question. You could even add an answer "Pineapple" with the value "mississippi" and validate against that, and just tell your users to choose that as their answer. The point is to personalize the randomization of data.
Display different robots.txt contents for different environments
Problem:
You've setup a subdomain, dev.yourdomain.com, as a development site to preview what you're working on before publishing changes to yourdomain.com, and want to disallow search indexers from crawling it while keeping the production site visible in search results.
Solution:
While you should password-protect your development site to really keep it private, sometimes it's sufficient, and just more practical, to simply disallow search engine indexers from crawling your site. Luckily, Grav can handle pages in txt format just as it does html, so we can use environment configurations and twig templates to complete the job.
First, let's create a configuration file site.yaml that will tell our template that dev.yourdomain.com is a development environment.
/user/[dev.yourdomain.com]/config/site.yaml:
environment: dev
Then, create a robots.txt.twig page template that checks if Grav is currently running on our development site, and displays different contents if it is.
/user/themes/[yourtheme]/templates/robots.txt.twig:
 1{% if config.site.environment == 'dev' %}
 2{% for rule in page.header.dev %}
 3{{ rule }}
 4{% endfor %}
 5
 6{% else %}
 7{{ page.content|raw }}
 8
 9{% endif %}
Finally, create a page routed at /robots.txt with the default robots.txt rules in the page content, and our alternative development version rules in the page frontmatter. To render the page contents as raw text instead of html, we'll also disable markdown rendering.
/user/pages/robots/robots.md:
 1---
 2routes:
 3  default: /robots.txt
 4process:
 5  markdown: false
 6
 7dev:
 8  - 'User-agent: *'
 9  - 'Disallow: /'
10---
11
12User-agent: *
13Disallow: /backup/
14Disallow: /bin/
15Disallow: /cache/
16Disallow: /grav/
17Disallow: /logs/
18Disallow: /system/
19Disallow: /vendor/
20Disallow: /user/
21Allow: /user/pages/
22Allow: /user/themes/
23Allow: /user/images/
24Allow: /user/plugins/*.css$
25Allow: /user/plugins/*.js$
Now you should have a robots.txt file placed at your site's root with dynamic contents, also editable with the Admin plugin.
Note: make sure your production site won't display Disallow: /, as that will completely obliterate your search engine visibility.